


Big Momma Turks Cap
Zones 8-11
Buy more, save more
Save up to $1,000 on your whole cart.
Discounts don't stack. At checkout you automatically get whichever saves you more.
See all savings tiers
Your code will auto-apply at checkout.
From our farm to your front door
- Shipped in its nursery pot, so the roots stay undisturbed
- Soil secured so it stays put in transit
- Packed so the plant stays steady on the way to you
At a glance
- Sunlight
- Full Sun, Partial Sun
- Water
- When the top 2–3" of soil is dry
- Growth & size
- Fast growth rate; mature height of 3-5 feet and width of 2-4 feet.
- Botanical name
- Malvaviscus drummondii ‘Big Momma’
- Hardiness
- Zones 8-11
- Tolerates
- Heat tolerantHumidity tolerantDrought tolerant
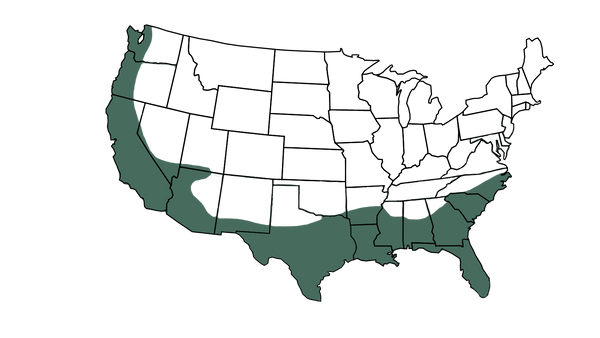
Where it grows in the groundShaded areas are the zones where it can be planted outdoors.


Size guide & what arrives
| *Trade size | **Pot size |
|---|---|
| 1 gallon | 6" |
| 3 gallon | 8 to 10" |
| 5 gallon | 10 to 12" |
| 7 gallon | 14" |
| 10 gallon | 15 to 17" |
| 15 gallon | 17" |
| "Jumbo" | 7 or 10 or 15 gallon |
*Nursery gallon sizes are trade sizes and do not equal standard liquid gallons.
**Pot sizes in inches refer to container width (diameter), not plant or pot height.
Please note: Sizing can differ between plant varieties and growers. Please chat with us if you need clarification.
For more information on sizing, please see our sizing guide.
What arrives
It thrives in warm climates and adds a bold splash of color to your landscape.
What customers are saying
Why customers love it

Healthy, well-rooted plants
Hand-selected and shipped in its nursery pot.

Delivered to your door
Skip the nursery trip. Very little car Tetris required.

Real plant experts
Ask us anything before or after planting.

1-year guarantee
If something goes wrong, we'll help make it right.
Care made simple
Plant it right once and it does the rest.
Pick the spot before you dig.
Water slowly and deeply. Check more often in its first summer.
Enter your ZIP above to check your zone.
Your first year together
- 1Day 1
Plant it, then water slowly until the whole root ball is soaked.
- 2First few weeks
Keep the soil evenly moist while new roots settle in.
- 3First summer
Water deeply during hot, dry spells.
- 4Next spring
New growth starts. Feed as it wakes up.
Planting instructions
Watering & sunlight
Care guide
Shipping & what's inside
Your plant ships in its nursery pot with the soil secured, packed so it stays steady on the way to you.
1-year guarantee
Every plant is covered by our 1-year guarantee. If something goes wrong, contact our team and we'll walk you through it.
 Answered by Simply Trees plant experts
How big does Big Momma Turk's Cap get?
How fast does Turk's cap grow?
How do you take care of Turk's cap?
Sunlight: Turk's Cap thrives in partial to full sun. It can tolerate a range of light conditions, but it generally produces more flowers with increased sunlight exposure. Plant it in an area where it receives at least 6 hours of sunlight per day.
Soil: This plant is adaptable to different soil types but prefers well-draining soil. It can grow in sandy, loamy, or clay soils. Amending the soil with organic matter, such as compost, can improve its texture and fertility.
Watering: During its initial establishment period, Turk's Cap benefits from regular watering. Keep the soil consistently moist but not waterlogged. Once established, it is relatively drought-tolerant, but it still appreciates occasional deep watering during dry spells.
Mulching: Applying a layer of mulch around the base of the plant can help conserve soil moisture, suppress weeds, and regulate soil temperature. Use organic mulch like wood chips or shredded leaves.
Pruning: Prune Turk's Cap as needed to maintain its shape and size. You can cut back the plant in late winter or early spring to encourage new growth and more prolific flowering. Deadheading spent flowers can also promote additional blooming.
Fertilization: Turk's Cap typically doesn't require heavy fertilization. You can apply a balanced, slow-release fertilizer in the spring to provide nutrients for the growing season. Follow the manufacturer's recommendations for application rates.
Pests and Diseases: Turk's Cap is relatively resistant to pests and diseases. However, monitor for common garden pests like aphids or spider mites, and treat infestations as necessary. Proper spacing and good air circulation can help prevent disease issues.
Wildlife Attraction: Turk's Cap is known for attracting hummingbirds and butterflies. Consider planting it in your garden to create a welcoming habitat for these pollinators.
Winter Protection (in colder climates): In regions with harsh winters, Turk's Cap may benefit from additional protection during the cold months. Mulching the base of the plant and covering it with burlap can help insulate it from freezing temperatures.
Hardiness Zones: Turk's Cap is typically hardy in USDA zones 8-11. In colder zones, it may be grown as an annual or brought indoors during the winter.
By providing the right growing conditions, regular maintenance, and monitoring for pests and diseases, you can enjoy the vibrant blooms and wildlife attraction that Turk's Cap offers in your garden.
Where is the best place to plant Turk's cap?
Sunlight: Turk's Cap can tolerate a range of light conditions but generally prefers partial to full sun. It can thrive in areas with dappled shade or morning sun with some afternoon shade. In regions with intense summer heat, providing some shade during the hottest part of the day can help the plant stay healthy.
Soil: This plant is not overly picky about soil type, but it prefers well-draining soil. Turk's Cap can grow in a variety of soil textures, including sandy, loamy, or clay soils. Adding organic matter to the soil can improve its overall quality and drainage.
Watering: Turk's Cap is relatively drought-tolerant once established, but it benefits from regular watering during its initial establishment period. Water deeply but allow the soil to dry out slightly between waterings to prevent overwatering, which can lead to root rot.
Space: Plant Turk's Cap in an area where it has enough space to spread. Keep in mind its spreading growth habit when choosing a location. It can work well as a border plant, along fences, or in naturalized areas where it can freely expand.
Hardiness Zone: Turk's Cap is typically hardy in USDA hardiness zones 8-11. Be sure to check your local climate and ensure that it is suitable for this plant. In colder zones, it may be grown as an annual or brought indoors during the winter.
Maintenance: Turk's Cap is generally low-maintenance and can be pruned to maintain its shape and size. Pruning can also help promote more prolific flowering.
Wildlife Attraction: Turk's Cap is a hummingbird and butterfly attractant, so consider planting it in a location where you can enjoy watching these pollinators visit your garden.
In summary, Turk's Cap is a versatile plant that can adapt to different conditions, making it suitable for a variety of garden settings. Ensure that it receives the right amount of sunlight, well-draining soil, and adequate spacing to thrive in your garden.
Does Turk's cap spread?
The extent of its spreading can vary depending on growing conditions and local climate. In favorable conditions, Turk's Cap can gradually spread and fill in an area. This can be an advantage if you're looking for a plant to cover a specific area in your garden or create a natural border.
However, if you want to control its spread or keep it in a specific area, you can do so by regularly pruning or thinning the plant. Turk's Cap responds well to pruning and can be maintained to your desired size and shape.
Keep in mind that Turk's Cap is considered a low-maintenance plant, and its spreading habit can be an attractive feature for those looking to create a lush and full garden landscape.
What happens to Turk's cap in the winter?
Deciduous Characteristics: Turk's Cap is deciduous, which means it sheds its leaves in the fall as temperatures drop. This is a natural process for many plants to conserve energy during the colder months.
Dormancy: In areas with mild winters, Turk's Cap may enter a period of dormancy. During this time, the above-ground growth, including leaves and stems, may die back or appear dormant. However, the plant's root system remains alive and well underground.
Re-Growth in Spring: As temperatures warm up in the spring, Turk's Cap will start to sprout new growth from the root system. You'll see new leaves and stems emerging from the ground. This new growth is a sign that the plant has survived the winter and is coming out of dormancy.
Flowering: Once the new growth is established, Turk's Cap will produce its distinctive red, tubular flowers, which attract pollinators like hummingbirds.
It's important to note that Turk's Cap is generally hardy in USDA hardiness zones 8-11, where winters are mild. In colder regions, where temperatures drop significantly below freezing, Turk's Cap may not survive the winter unless it's protected or grown as an annual.
To help your Turk's Cap survive the winter and thrive in the spring, consider providing some protection during frosty nights, such as covering it with a frost cloth or mulching around the base of the plant to insulate the roots. In mild winter areas, this extra care may not be necessary, as Turk's Cap is adapted to the local climate.
Do hummingbirds like Turk's cap?
If you want to attract hummingbirds to your garden, planting Turk's Cap is a great choice. Providing a variety of nectar-rich flowers in your garden, including Turk's Cap, can help create a welcoming environment for these delightful and colorful birds.
Can you grow Turk's cap in containers?
Container Size: Select a large container with good drainage. Turk's Cap can grow to be a substantial shrub, so choose a container that allows for root growth. A 5-gallon or larger pot is typically suitable for a single plant.
Potting Mix: Use a well-draining potting mix that contains organic matter. This will provide good aeration for the roots and help prevent waterlogging.
Sunlight: Turk's Cap prefers full sun to partial shade. Ensure your container is placed in a location where it will receive at least 6 hours of direct sunlight per day.
Watering: Container plants often require more frequent watering than those in the ground because they can dry out more quickly. Keep the soil consistently moist, but avoid overwatering, which can lead to root rot.
Fertilization: Container plants may benefit from regular fertilization because the nutrients in pots can become depleted over time. Use a balanced, slow-release fertilizer or liquid fertilizer according to the package instructions.
Pruning: Prune your Turk's Cap to maintain its shape and size, especially if it starts to outgrow its container. Pruning in late winter or early spring is ideal.
Overwintering: In colder climates, Turk's Cap in containers may be vulnerable to freezing temperatures. You can move the container to a sheltered location or provide insulation to protect the roots during winter.
Repotting: As your Turk's Cap grows, it may become root-bound in its container. Consider repotting it into a larger container every few years to ensure healthy root development.
Growing Turk's Cap in containers can be a great option, especially if you have limited garden space or want to enjoy its unique blooms on a patio or balcony. Just be attentive to its specific care requirements to ensure it thrives in its container environment.
Why are my Turk's caps not blooming?
Insufficient Sunlight: Turk's Cap plants typically require full sun to partial shade to produce abundant blooms. If they are planted in a location with too much shade, they may not flower well. Ensure they receive at least 6 hours of direct sunlight per day.
Pruning at the Wrong Time: Turk's Cap flowers on new growth, so if you prune them at the wrong time, you might be removing potential flower buds. Prune them in late winter or early spring before new growth begins.
Nutrient Deficiency: Poor soil fertility can lead to reduced flowering. Ensure your Turk's Cap plants receive adequate nutrients by amending the soil with organic matter and using a balanced fertilizer.
Watering Issues: Overwatering or underwatering can stress the plants and hinder flowering. Make sure the soil is well-draining and water the plants consistently, keeping the soil evenly moist but not waterlogged.
Age of the Plant: Young Turk's Cap plants may take some time to establish before they start producing abundant blooms. Be patient, and with proper care, they should eventually flower more prolifically as they mature.
Pests and Diseases: Check for any signs of pest infestations or diseases on your plants. Insect damage or disease issues can affect their overall health and blooming capacity.
Varietal Differences: Some Turk's Cap varieties may naturally produce fewer blooms than others. Consider the specific variety you have and its typical blooming habits.
By addressing these potential issues and providing the right growing conditions, you can encourage your Turk's Cap plants to produce more blooms and enhance the beauty of your garden.
When is the best time to plant Turk's cap?
When planting, make sure to choose a location with well-draining soil and partial to full sun exposure. Provide regular watering during the establishment phase, and mulch around the base of the plant to help retain moisture and suppress weeds. Turk's Cap is known for its attractive red flowers and ability to attract hummingbirds, making it a great addition to your garden landscape.